Mastering Home Fermentation: Easy Projects for Flavor & Health
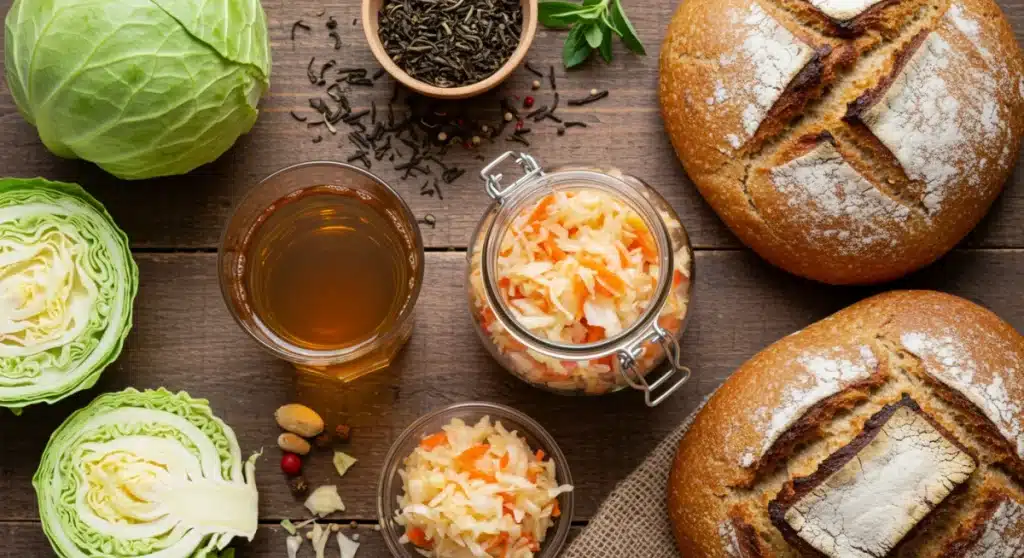
In an era where processed foods dominate our diets, a quiet revolution is taking place in kitchens worldwide: the resurgence of home fermentation projects. More than just a culinary trend, fermentation is a time-honored tradition that transforms simple ingredients into nutrient-dense, flavor-packed powerhouses. From the tangy crunch of sauerkraut to the effervescent delight of kombucha and the rustic charm of sourdough bread, these fermented foods offer a plethora of health benefits, particularly for gut health, and an explosion of unique flavors that store-bought alternatives simply can’t match.
Anúncios
The journey into home fermentation projects might seem daunting at first, conjuring images of complex scientific processes and potential pitfalls. However, the reality is far more accessible than you might imagine. With a few basic tools, simple ingredients, and a dash of patience, anyone can embark on this rewarding culinary adventure. This comprehensive guide will demystify the world of fermentation, providing you with the foundational knowledge and step-by-step instructions for three incredibly easy and satisfying home fermentation projects: kombucha, sauerkraut, and sourdough. By the end, you’ll be well-equipped to cultivate your own living foods, enhancing your diet, diversifying your palate, and connecting with a rich heritage of food preservation.
Whether you’re a seasoned foodie looking to expand your skills or a health-conscious individual seeking to improve your gut microbiome, these home fermentation projects are your gateway to a world of delicious possibilities. Let’s dive in and discover the magic that happens when microbes meet food!
Anúncios
What is Fermentation? The Science Behind the Magic
Before we delve into specific home fermentation projects, it’s crucial to understand the fundamental process at play. Fermentation is essentially a metabolic process in which microorganisms – primarily bacteria, yeasts, and molds – convert carbohydrates (sugars) into alcohol, gases, or organic acids. This transformation not only preserves food but also enhances its nutritional value, digestibility, and, perhaps most notably, its flavor profile.
Think of it as controlled decomposition, but in the best possible way! These beneficial microbes consume the sugars in food and produce a variety of compounds. For example, in lactic acid fermentation (used for sauerkraut), bacteria convert sugars into lactic acid, which acts as a natural preservative and gives the food its characteristic tangy taste. In alcoholic fermentation (relevant for kombucha and sourdough), yeasts convert sugars into alcohol and carbon dioxide.
The Role of Microbes in Fermentation
- Bacteria: Often responsible for lactic acid fermentation, creating sour flavors and preserving vegetables. Examples include Lactobacillus species.
- Yeasts: Key players in alcoholic fermentation, converting sugars into ethanol and carbon dioxide, crucial for kombucha’s fizz and sourdough’s rise. An example is Saccharomyces cerevisiae.
- Molds: While some molds are undesirable, others, like those found in blue cheese or tempeh, contribute unique flavors and textures.
The beauty of home fermentation projects lies in harnessing these microscopic allies to create foods that are not only delicious but also incredibly beneficial for our health. By understanding this basic science, you gain a deeper appreciation for the transformations happening in your kitchen.
Unlocking the Health and Flavor Benefits of Home Fermentation
The appeal of home fermentation projects extends far beyond the sheer joy of creating something with your own hands. The health and flavor advantages are compelling reasons to incorporate fermented foods into your daily diet.
Enhanced Nutritional Value and Digestibility
Fermentation can significantly boost the nutritional content of foods. Microorganisms produce B vitamins (like B12, often lacking in plant-based diets), vitamin K2, and omega-3 fatty acids. They also break down complex carbohydrates and proteins, making nutrients more bioavailable and easier for our bodies to digest. For individuals with digestive sensitivities, fermented foods can be a game-changer.
A Boost for Gut Health: Probiotics Galore
Perhaps the most celebrated benefit of fermented foods is their rich probiotic content. Probiotics are live microorganisms that, when consumed in adequate amounts, confer a health benefit on the host. A healthy gut microbiome is linked to improved digestion, a stronger immune system, better mood regulation, and even skin health. Regularly consuming probiotic-rich foods from your home fermentation projects can help replenish and diversify your gut flora.
Unparalleled Flavor Development
Beyond health, the flavor transformations are truly remarkable. Fermentation introduces a spectrum of complex, nuanced tastes that are often described as umami, tangy, savory, and deeply satisfying. This adds incredible depth to meals, allowing you to reduce reliance on artificial flavorings or excessive salt. The unique profiles of homemade kombucha, the pungent sourness of sauerkraut, and the distinctive tang of sourdough are testaments to the power of microbial alchemy.
Food Preservation and Reduced Waste
Historically, fermentation was a vital method of food preservation before refrigeration. By creating an acidic or alcoholic environment, harmful bacteria are inhibited, allowing foods to last longer naturally. This aspect of home fermentation projects can help reduce food waste, making the most of your produce and ingredients.
Essential Tools and Hygiene for Your Fermentation Journey
Embarking on home fermentation projects doesn’t require a vast array of specialized equipment. Many of the tools you need are likely already in your kitchen. However, a few specific items and a commitment to cleanliness will set you up for success.
Basic Equipment
- Glass Jars: Wide-mouth mason jars (pint, quart, or half-gallon) are ideal for most projects. Ensure they are clean and sterilized.
- Airlocks and Lids (Optional but Recommended): For some ferments, an airlock (a device that allows gases to escape but prevents air from entering) can provide an anaerobic environment, reducing the risk of mold. Standard lids or cloth covers with rubber bands work for many projects too.
- Large Mixing Bowls: For preparing ingredients.
- Kitchen Scale: Essential for accurate measurements, especially for sourdough.
- Measuring Cups and Spoons: Standard kitchen tools.
- Wooden Spoons or Spatulas: Avoid metal with some ferments, as it can react with the acidic environment.
- Cheesecloth or Breathable Fabric: To cover jars, allowing airflow while keeping pests out.
- pH Strips or Meter (Optional): For precise monitoring, especially in kombucha.
The Golden Rule: Hygiene!
Cleanliness is paramount in home fermentation projects. While we’re encouraging beneficial bacteria, we want to discourage unwanted intruders like mold. Always:
- Wash Your Hands: Thoroughly with soap and hot water before handling ingredients or equipment.
- Sterilize Your Jars and Utensils: You can do this by washing them in hot, soapy water and then rinsing thoroughly, or by running them through a dishwasher on a hot cycle. For extra precaution, you can boil jars for 10 minutes.
- Use Clean Water: Filtered or dechlorinated water is often preferred, especially for kombucha, as chlorine can inhibit beneficial microbes.
- Keep Your Workspace Clean: Wipe down counters and surfaces before you begin.
Don’t be intimidated by the need for hygiene; it quickly becomes second nature. A clean environment ensures your beneficial microbes thrive and your ferments are safe and delicious.
3 Easy Home Fermentation Projects to Start Today
Now for the exciting part! Here are three incredibly rewarding and relatively easy home fermentation projects perfect for beginners. Each offers distinct flavors and health benefits, providing a fantastic entry point into the world of live foods.
Project 1: Tangy Sauerkraut – The Gut Health Powerhouse
Sauerkraut, a traditional German staple, is fermented cabbage and salt. It’s incredibly simple to make, packed with probiotics, and wonderfully versatile. It’s a perfect starter project for anyone interested in home fermentation projects.
What You’ll Need:
- 1 medium head of green cabbage (about 2-3 lbs)
- 2-3 tablespoons non-iodized sea salt (iodine can inhibit fermentation)
- Optional: Caraway seeds, juniper berries, shredded carrots, or apples for flavor variations
- Large mixing bowl
- Sharp knife or mandoline
- 1-quart wide-mouth mason jar
- Something to weigh down the cabbage (e.g., a smaller jar filled with water, a clean rock, or a fermentation weight)
- Clean cloth or coffee filter and rubber band
Step-by-Step Instructions:
- Prepare the Cabbage: Remove outer, bruised leaves from the cabbage. Reserve one or two large, intact outer leaves. Quarter the cabbage and remove the core. Slice the cabbage thinly, either by hand with a sharp knife or using a mandoline.
- Salt and Massage: Place the shredded cabbage in a large mixing bowl. Sprinkle with the non-iodized sea salt. Begin massaging and squeezing the cabbage vigorously with your clean hands (or a potato masher/pounder). This process breaks down the cell walls and helps draw out moisture. Continue for 5-10 minutes until a significant amount of brine (liquid) has accumulated in the bottom of the bowl.
- Pack into Jar: Tightly pack the cabbage into your clean quart jar. Press down firmly with your fist or a blunt tool after each addition to remove air pockets and ensure the cabbage is submerged under the brine.
- Submerge and Weigh: Once all the cabbage is packed, pour any remaining brine from the bowl over the cabbage. Place one of the reserved whole cabbage leaves on top, pressing it down to create a barrier. Then, place your fermentation weight (or smaller jar filled with water) on top of the cabbage leaf. It’s crucial that all the shredded cabbage remains submerged under the brine to prevent mold growth.
- Cover and Ferment: Cover the jar opening with a clean cloth or coffee filter and secure it with a rubber band. This allows airflow while keeping pests out. Place the jar in a cool, dark spot (ideally 60-75°F / 15-24°C) out of direct sunlight.
- Monitor and Taste: Check your sauerkraut daily. Press down on the weight if necessary to ensure the cabbage stays submerged. You might see bubbles, which is a sign of active fermentation. After about 5-7 days, begin tasting. It should be pleasantly sour and slightly salty. Ferment longer for a stronger, more complex flavor (up to 2-4 weeks).
- Store: Once it reaches your desired flavor, remove the weight and cloth cover, seal the jar with a regular lid, and store it in the refrigerator. It will continue to ferment slowly but will last for several months.
Congratulations, you’ve just completed your first of many home fermentation projects! Enjoy your homemade probiotic-rich sauerkraut!
Project 2: Bubbly Kombucha – The Fizzy Health Drink
Kombucha, a fermented tea, has gained immense popularity for its refreshing fizz and purported health benefits. Making it at home is more cost-effective and allows for endless flavor customization. This is one of the most rewarding home fermentation projects.
What You’ll Need:
- SCOBY (Symbiotic Culture of Bacteria and Yeast) – you can get one from a friend, buy one online, or grow your own from a bottle of unpasteurized, plain kombucha.
- 1 cup starter tea (plain unflavored kombucha from a previous batch or store-bought unpasteurized kombucha)
- 1 gallon glass jar or fermentation vessel
- 1 cup granulated sugar
- 8 black or green tea bags (or 2 tablespoons loose leaf tea)
- 14 cups filtered or dechlorinated water
- Large pot for brewing tea
- Clean cloth or coffee filter and rubber band
- Bottles with airtight seals for second fermentation (e.g., swing-top bottles)
Step-by-Step Instructions (First Fermentation – F1):
- Brew the Sweet Tea: Bring 7 cups of filtered water to a boil in a large pot. Remove from heat, add the tea bags (or loose leaf tea), and steep for 5-7 minutes. Remove tea bags/strain loose leaf tea. Stir in the sugar until fully dissolved.
- Cool the Tea: Add the remaining 7 cups of cold filtered water to the pot. This helps cool the tea down faster. It’s crucial that the tea cools to room temperature (68-85°F / 20-30°C) before proceeding. Hot tea will kill your SCOBY.
- Combine and Ferment: Pour the cooled sweet tea into your gallon fermentation jar. Gently add the SCOBY and the 1 cup of starter tea. The starter tea is vital as it lowers the pH, preventing mold and kickstarting the fermentation.
- Cover and Place: Cover the jar opening with a clean cloth or coffee filter and secure with a rubber band. Place the jar in a warm spot (70-80°F / 21-27°C) out of direct sunlight.
- Monitor and Taste: Fermentation usually takes 7-14 days. A new baby SCOBY will often form on top. After 5-7 days, begin tasting your kombucha daily using a clean straw or spoon. It will start sweet and gradually become more tart. When it reaches your desired balance of sweet and sour, it’s ready for bottling.

Second Fermentation (F2 – For Flavoring and Fizz):
- Harvest Kombucha: Carefully remove the SCOBY and about 1-2 cups of the finished kombucha (this is your new starter tea for the next batch) and place them in a clean bowl.
- Flavor Your Kombucha: Pour the remaining kombucha into your airtight bottles, leaving about 1-2 inches of headspace. This is where you add your flavors! Popular options include chopped fruit (berries, ginger, citrus), fruit juice, herbs (mint, basil), or spices.
- Bottle and Fizz: Seal the bottles tightly. Place them in a warm spot for 1-3 days. The added sugar from the fruit/juice will cause a second fermentation, creating carbonation.
- Refrigerate: Once sufficiently fizzy (you can test by opening one bottle carefully over a sink), move the bottles to the refrigerator. This slows down fermentation and carbonation. Enjoy your homemade kombucha!
Kombucha is a fantastic addition to your repertoire of home fermentation projects, offering endless creative possibilities for flavor.
Project 3: Artisan Sourdough Bread – The Ancient Grain Delight
Sourdough bread, with its chewy crumb, crispy crust, and distinctive tang, is a testament to the power of wild yeasts and bacteria. While it requires a bit more commitment than the other two home fermentation projects, the reward is immeasurable. The first step is creating a sourdough starter.
Part 1: Creating Your Sourdough Starter
Your starter is a living culture of wild yeast and lactobacilli. It takes about 7-10 days to become active.
What You’ll Need:
- 1-quart wide-mouth glass jar with a loose-fitting lid (or plastic wrap)
- Whole wheat flour or organic unbleached all-purpose flour
- Filtered or dechlorinated water at room temperature
- Kitchen scale (highly recommended for accuracy)
Step-by-Step Instructions (Starter Creation):
- Day 1: In your clean jar, combine 50g (about 1/2 cup) whole wheat flour and 50g (about 1/4 cup) filtered water. Mix thoroughly until no dry spots remain. Cover loosely with the lid or plastic wrap and leave at room temperature (ideally 70-75°F / 21-24°C).
- Days 2-7 (or until active): Each day, discard all but 50g (about 1/4 cup) of your starter. Feed the remaining 50g with 50g fresh flour and 50g fresh water. Mix well, cover loosely, and return to room temperature.
- What to Look For: Initially, you might see little activity. By day 3-5, you should start seeing small bubbles and a faint sour smell. By day 7-10, your starter should be consistently bubbling, rising significantly after feeding (often doubling in size within 4-8 hours), and smelling pleasantly yeasty and sour. This means it’s active and ready for baking!
Once active, you can store your starter in the refrigerator and feed it once a week. Bring it to room temperature and feed it 1-2 times before baking.
Part 2: Baking Your First Sourdough Loaf (No-Knead Method)
This recipe is designed for beginners and minimizes active kneading time.
What You’ll Need:
- 100g active sourdough starter (fed 4-8 hours prior and bubbly)
- 350g filtered water (room temperature)
- 500g strong bread flour (unbleached)
- 10g fine sea salt
- Large mixing bowl
- Dough scraper or spatula
- Banneton (proofing basket) or a bowl lined with a floured kitchen towel
- Dutch oven or heavy-bottomed pot with a lid
Step-by-Step Instructions (Baking):
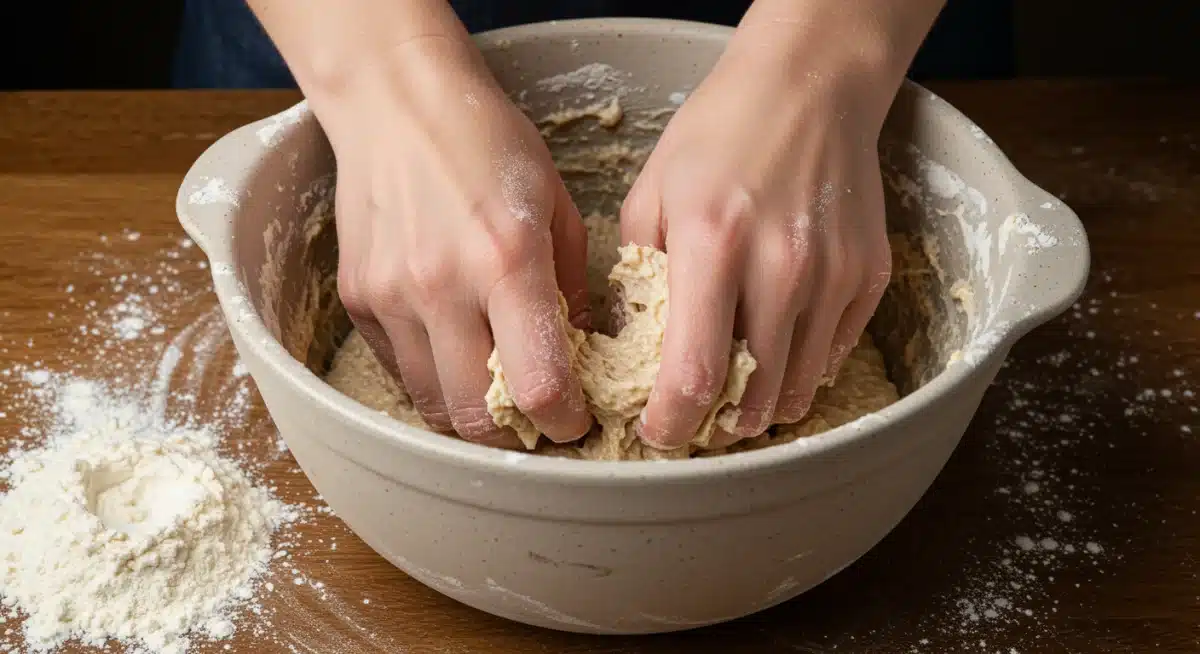
- Mix Autolyse: In a large bowl, combine the 350g water and 100g active starter. Mix gently. Add 500g bread flour and mix until no dry flour remains. It will be shaggy. Cover the bowl and let it rest for 30 minutes to 1 hour (autolyse), allowing the flour to fully hydrate.
- Add Salt and Mix: Sprinkle the 10g salt over the dough. With wet hands, gently incorporate the salt by squeezing and folding the dough in the bowl for a few minutes.
- Stretch and Folds (Bulk Fermentation): Over the next 2-4 hours (depending on room temperature), perform a series of ‘stretch and folds’ every 30-60 minutes. To do this, wet your hands, grab a portion of the dough from one side, stretch it up, and fold it over itself to the opposite side. Rotate the bowl and repeat 3-4 times. This builds strength. The dough will become smoother and more elastic.
- Pre-shape: Gently turn the dough out onto a lightly floured surface. Gently shape it into a round or oval. Let it rest, uncovered, for 20-30 minutes.
- Final Shape: Lightly flour your hands and the work surface. Gently shape the dough into its final form (round or oval), creating surface tension. Place it seam-side up into your floured banneton or towel-lined bowl.
- Cold Proof (Retardation): Cover the banneton/bowl with plastic wrap or a shower cap and refrigerate for 12-18 hours. This develops flavor and makes the dough easier to handle.
- Preheat Oven & Dutch Oven: About 1 hour before baking, place your Dutch oven (with the lid on) into your oven and preheat to 450°F (230°C).
- Score and Bake: Carefully remove the hot Dutch oven from the oven. Gently invert your cold dough into the hot Dutch oven. Score the top of the dough with a sharp razor blade or knife (this helps control expansion). Place the lid back on. Bake for 20-25 minutes with the lid on.
- Finish Baking: Remove the lid and continue baking for another 20-30 minutes, or until the crust is deeply golden brown and the internal temperature reaches 200-210°F (93-99°C).
- Cool: Carefully remove the bread from the Dutch oven and place it on a wire rack to cool completely for at least 1-2 hours before slicing. This is crucial for texture and flavor development.
Baking sourdough is one of the most rewarding home fermentation projects, connecting you to an ancient craft and yielding incredibly delicious results.
Common Fermentation Troubleshooting and Tips
As with any new skill, you might encounter a few bumps along the road in your home fermentation projects. Don’t be discouraged! Most issues are easily remedied.
Sauerkraut Troubleshooting:
- Mold: If you see fuzzy, colored spots (black, green, pink), it’s mold. Discard the entire batch. This usually happens if the cabbage isn’t fully submerged in brine, or if hygiene wasn’t adequate.
- Kahm Yeast: A white, powdery film on the surface that looks like yeast. It’s harmless but can impart off-flavors. Skim it off carefully. Often a sign of too much oxygen exposure.
- Too Salty/Not Salty Enough: Adjust salt content in future batches. Too little salt can lead to spoilage; too much can slow fermentation.
- No Bubbles: Fermentation might be happening slowly, especially in cooler temperatures. Give it more time. As long as there’s no mold and it smells good, it’s likely fine.
Kombucha Troubleshooting:
- Mold: Similar to sauerkraut, fuzzy, colored mold means discard. This often happens if the starter tea wasn’t acidic enough or the tea was too hot when the SCOBY was added.
- No New SCOBY/Activity: Ensure your starter tea was strong, your SCOBY is healthy, and the temperature is warm enough.
- Too Vinegary: You’ve fermented it too long! Next time, taste earlier and bottle sooner.
- Not Fizzy Enough: Increase the sugar content in F2 (more fruit/juice), or let it ferment longer in F2. Ensure bottles are truly airtight.
Sourdough Troubleshooting:
- Inactive Starter: Feed it consistently for several days at room temperature. Ensure you’re using unbleached flour and filtered water.
- Flat Loaf: Could be an inactive starter, underdeveloped gluten (not enough stretch and folds), over-proofed dough, or not enough oven spring (oven not hot enough, Dutch oven not preheated).
- Dense Crumb: Often linked to an inactive starter or insufficient proofing.
- Hard/Thick Crust: Common for sourdough. Ensure proper steam in the oven (the Dutch oven helps with this).
General Tips for All Home Fermentation Projects:
- Temperature Matters: Most ferments prefer a consistent room temperature. Too cold, and fermentation slows; too hot, and off-flavors or spoilage can occur.
- Trust Your Nose: A good ferment should smell pleasantly sour, yeasty, or tangy. If it smells foul, rotten, or like alcohol solvent, it’s likely gone bad.
- Don’t Be Afraid to Experiment: Once you master the basics, try different ingredients, spices, and flavor combinations.
- Keep Good Records: Note down temperatures, ingredients, and fermentation times. This helps you replicate successes and learn from failures.
Embrace the Art of Home Fermentation
The world of home fermentation projects is vast and rewarding, offering a unique blend of culinary creativity, scientific discovery, and tangible health benefits. By embarking on these three easy projects – tangy sauerkraut, bubbly kombucha, and artisan sourdough bread – you’ve not only learned valuable skills but also opened up a gateway to a more flavorful and health-conscious lifestyle.
Remember, fermentation is a living process. It’s dynamic, sometimes unpredictable, but always fascinating. Don’t strive for perfection from the outset; instead, embrace the learning curve, celebrate your successes, and learn from any batches that don’t quite go as planned. Each attempt deepens your understanding and hones your intuition as a fermenter.
As you continue your journey, you’ll discover new ingredients, explore different cultures’ fermented traditions, and perhaps even create your own unique recipes. The satisfaction of crafting your own probiotic-rich foods, knowing exactly what goes into them, and sharing them with loved ones is an experience unlike any other.
So, gather your jars, prepare your ingredients, and let the beneficial microbes do their magic. Your kitchen is about to become a vibrant hub of delicious, living foods. Happy fermenting!


