Mastering Bakery-Quality Frosting: 6 Pro Techniques for 2026 Desserts

Anúncios
Are you tired of your homemade cakes and cupcakes looking, well, homemade? Do you dream of achieving that perfectly smooth, lusciously rich, and visually stunning frosting that graces the windows of the finest bakeries? The good news is that bakery quality frosting isn’t an elusive art reserved for professional pastry chefs. With the right techniques, a little patience, and attention to detail, you can transform your desserts into showstoppers that rival any professional creation. As we approach 2026, the demand for visually appealing and exquisitely flavored desserts continues to grow, making these skills more relevant than ever.
Anúncios
This comprehensive guide will walk you through six essential techniques to master bakery quality frosting. We’ll delve into everything from ingredient selection and proper mixing to advanced application methods and finishing touches. Whether you’re a seasoned home baker or just starting your culinary journey, these tips will elevate your frosting game and ensure your 2026 desserts are nothing short of spectacular.
Anúncios
The Foundation of Excellence: Understanding Your Ingredients
Before we dive into techniques, let’s talk about the bedrock of any exquisite frosting: the ingredients. Just like a master painter selects the finest pigments, a skilled baker chooses superior components. The quality of your ingredients directly impacts the texture, flavor, and stability of your bakery quality frosting.
1. Butter: The Heart of Buttercream
For buttercreams, butter is king. Opt for unsalted, high-quality butter with a higher fat content (typically 82% or more). European-style butters often fit this description. Why unsalted? It gives you control over the saltiness, allowing you to balance the sweetness. Ensure your butter is at the correct temperature – usually softened, but not melted. It should yield slightly when pressed, but still hold its shape. Too cold, and it won’t cream properly, leading to lumpy frosting. Too warm, and your frosting will be greasy and unstable.
2. Sugar: Granulation Matters
Confectioners’ sugar (powdered sugar) is the go-to for most frostings because of its fine texture, which ensures a smooth, lump-free finish. However, not all confectioners’ sugars are created equal. Some brands can be coarser than others. Sifting your confectioners’ sugar is a non-negotiable step to prevent grittiness and achieve that desired bakery quality frosting texture. For some frostings, like Italian or Swiss meringue buttercreams, granulated sugar is used to create a stable meringue base.
3. Liquids: Milk, Cream, or Water?
The liquid you choose affects consistency and richness. Whole milk or heavy cream adds richness and a creamy mouthfeel, perfect for a decadent bakery quality frosting. Water can be used for a lighter finish or when you want to keep the fat content lower, but it may compromise some of the creaminess. Always add liquids gradually, a tablespoon at a time, until you reach your desired consistency.
4. Flavorings: Extracts, Zests, and Purees
Vanilla extract is a classic, but don’t limit yourself! High-quality pure vanilla extract makes a significant difference. Explore other extracts like almond, lemon, or peppermint. Fresh citrus zests provide bright, natural flavors without adding excess liquid. Fruit purees, coffee, or melted chocolate can also be incorporated for complex flavor profiles, but be mindful of how they might affect the frosting’s consistency.
Technique 1: Achieving the Perfect Butter Consistency
This might seem basic, but it’s often overlooked. The temperature of your butter is paramount for a smooth, emulsified bakery quality frosting. For most buttercreams, you want softened butter, not melted or rock-hard. Softened butter should be pliable enough to leave an indentation when gently pressed with a finger, but still cool to the touch and hold its shape. If your butter is too cold, your frosting will be lumpy and difficult to spread. If it’s too warm, your frosting will be greasy, runny, and won’t hold its shape.
How to Achieve Perfect Softened Butter:
- Room Temperature: The ideal method is to leave butter out at room temperature for 1-2 hours, depending on the ambient temperature.
- Quick Softening (Carefully!): If you’re short on time, you can microwave butter in short bursts (5-10 seconds) on low power, flipping it after each burst. Be extremely cautious not to melt it.
- Water Bath: Place the wrapped butter in a bowl of warm (not hot) water for 10-15 minutes.
- Cut into Pieces: Cutting cold butter into smaller cubes can help it soften faster.
Once your butter is perfectly softened, you’re ready to cream it. This involves beating the butter alone or with sugar until it’s light, fluffy, and pale in color. This process incorporates air, which is crucial for a light and airy bakery quality frosting.
Technique 2: The Art of Sifting and Gradual Addition
Lumps are the enemy of smooth frosting. Sifting your confectioners’ sugar is a non-negotiable step to prevent a gritty texture. Even if your sugar looks fine, it often contains small clumps that will become apparent in your finished frosting. Use a fine-mesh sieve or a sifter to ensure a silky-smooth result for your bakery quality frosting.
Why Sifting is Crucial:
- Eliminates Lumps: Breaks up any packed sugar, ensuring a uniform consistency.
- Incorporates Air: Lightens the sugar, making it easier to blend and contributing to a fluffier frosting.
- Removes Impurities: Catches any potential foreign particles or hardened bits.
Gradual Addition of Ingredients:
Once sifted, add your confectioners’ sugar to the butter (or butter and other fats) gradually. Don’t dump it all in at once! This prevents a sugar cloud from engulfing your kitchen and allows the sugar to be properly incorporated, spoonful by spoonful. Start your mixer on low speed to prevent the sugar from flying out of the bowl, then increase to medium.
Similarly, when adding liquids (milk, cream, or flavorings), do so slowly, a tablespoon or even a teaspoon at a time. This gives you precise control over the consistency. It’s much easier to add more liquid than to try and thicken a too-runny frosting. This meticulous approach is key to achieving that coveted bakery quality frosting texture.
Technique 3: Mastering Different Frosting Types
Not all frostings are created equal, and understanding the nuances of each type is crucial for selecting the right one for your dessert and achieving a professional finish. Different types of bakery quality frosting offer distinct textures, flavors, and levels of stability.
a. American Buttercream: The Classic Choice
This is perhaps the most common and easiest frosting to make. It’s a simple mixture of softened butter, powdered sugar, liquid (milk or cream), and flavoring. While easy, it can sometimes be overly sweet or too soft. For a better American buttercream, use high-quality butter, sift your sugar, and beat it for a longer time than you might think – 5 to 7 minutes on medium-high speed – to incorporate air and reduce sweetness perception. A pinch of salt can also balance the sweetness effectively.
b. Swiss Meringue Buttercream (SMBC): Silky Smooth Perfection
SMBC is a favorite among professional bakers for its incredibly smooth, silky texture, less intense sweetness, and excellent stability. It starts with heating egg whites and granulated sugar over a double boiler until the sugar dissolves and the mixture reaches about 160°F (71°C). This pasteurized meringue is then whipped until stiff, glossy, and completely cooled, before softened butter is gradually added. The result is a light, airy, yet rich bakery quality frosting that pipes beautifully and holds up well.
c. Italian Meringue Buttercream (IMBC): The Most Stable
Similar to SMBC, IMBC uses a hot sugar syrup (cooked to soft-ball stage, 240°F/116°C) that is slowly streamed into whipping egg whites. This method creates the most stable and heat-resistant meringue buttercream, making it ideal for intricate piping and warmer climates. IMBC results in a very smooth, light, and less sweet bakery quality frosting that is incredibly versatile.
d. Cream Cheese Frosting: Tangy and Delicious
A beloved topping for red velvet and carrot cakes. The key to a stable cream cheese frosting is using full-fat block cream cheese (not spreadable tub varieties) that is chilled. Beat the cream cheese and butter together until smooth, then gradually add sifted powdered sugar. Over-mixing cream cheese frosting can make it runny, so mix only until just combined. A touch of lemon juice can enhance the tanginess and brighten the flavor.
e. Ganache: Elegant and Rich
While not a traditional frosting, ganache (a mixture of chocolate and cream) can be whipped to a fluffy consistency, making it an exquisite topping. The ratio of chocolate to cream dictates its final texture. For a pourable ganache, use equal parts chocolate and cream. For a thicker, whipped ganache, use a higher chocolate-to-cream ratio (e.g., 2 parts chocolate to 1 part cream). Allow the ganache to cool completely and thicken before whipping for a light and airy bakery quality frosting.
Technique 4: Proper Mixing and Aeration
The way you mix your frosting significantly impacts its texture. For most buttercreams, aeration is key to achieving a light, fluffy, and spreadable consistency that epitomizes bakery quality frosting. This means beating the frosting for a sufficient amount of time, often longer than you might initially think.
Creaming Butter and Sugar:
When starting with butter and powdered sugar (as in American buttercream), cream the softened butter on its own for a minute or two first to make it extra smooth. Then, gradually add the sifted powdered sugar. Once all the sugar is incorporated, increase the speed to medium-high and beat for 5-8 minutes. This long beating time incorporates air, lightens the color, and creates a much fluffier, less dense frosting. It also helps dissolve any remaining sugar crystals, leading to a smoother mouthfeel.
Scraping Down the Bowl:
Regularly stop your mixer and scrape down the sides and bottom of the bowl with a rubber spatula. This ensures all ingredients are uniformly incorporated and prevents pockets of unmixed butter or sugar, which can lead to a lumpy or inconsistent bakery quality frosting.
Whipping Meringue Buttercreams:
For Swiss and Italian meringue buttercreams, the whipping of the meringue is critical. Beat the meringue until it forms stiff, glossy peaks and, crucially, until the bowl is completely cool to the touch. If you add butter to a warm meringue, the butter will melt, and your frosting will be runny and soupy. Patience here pays off in a perfectly stable and airy bakery quality frosting.
Technique 5: Achieving the Right Consistency and Smoothness
The ideal consistency of bakery quality frosting depends on its intended use. Frosting for filling a cake might be slightly softer than frosting for intricate piping work. Learning to adjust consistency is a vital skill.
Adjusting Consistency:
- Too Stiff: If your frosting is too thick, add liquid (milk, cream, or water) one teaspoon at a time, beating well after each addition, until it reaches the desired spreadable or pipeable consistency.
- Too Runny: If your frosting is too thin, you can try adding more sifted powdered sugar, one tablespoon at a time. For buttercreams that are too runny due to warm butter, chilling the frosting for 15-30 minutes and then re-whipping it can often rescue it. For meringue buttercreams, sometimes re-whipping for a longer period can help, or adding a bit more softened butter if the meringue itself is stable.
The Hot Spatula Trick:
For an ultra-smooth finish on your iced cakes, especially with American buttercream, try the ‘hot spatula’ trick. After crumb-coating and applying your final layer of frosting, dip a metal offset spatula in hot water, wipe it completely dry, and then lightly run it over the surface of your cake. The warmth will slightly melt the surface of the frosting, allowing it to become incredibly smooth and professional-looking. This is a secret weapon for achieving that pristine bakery quality frosting look.
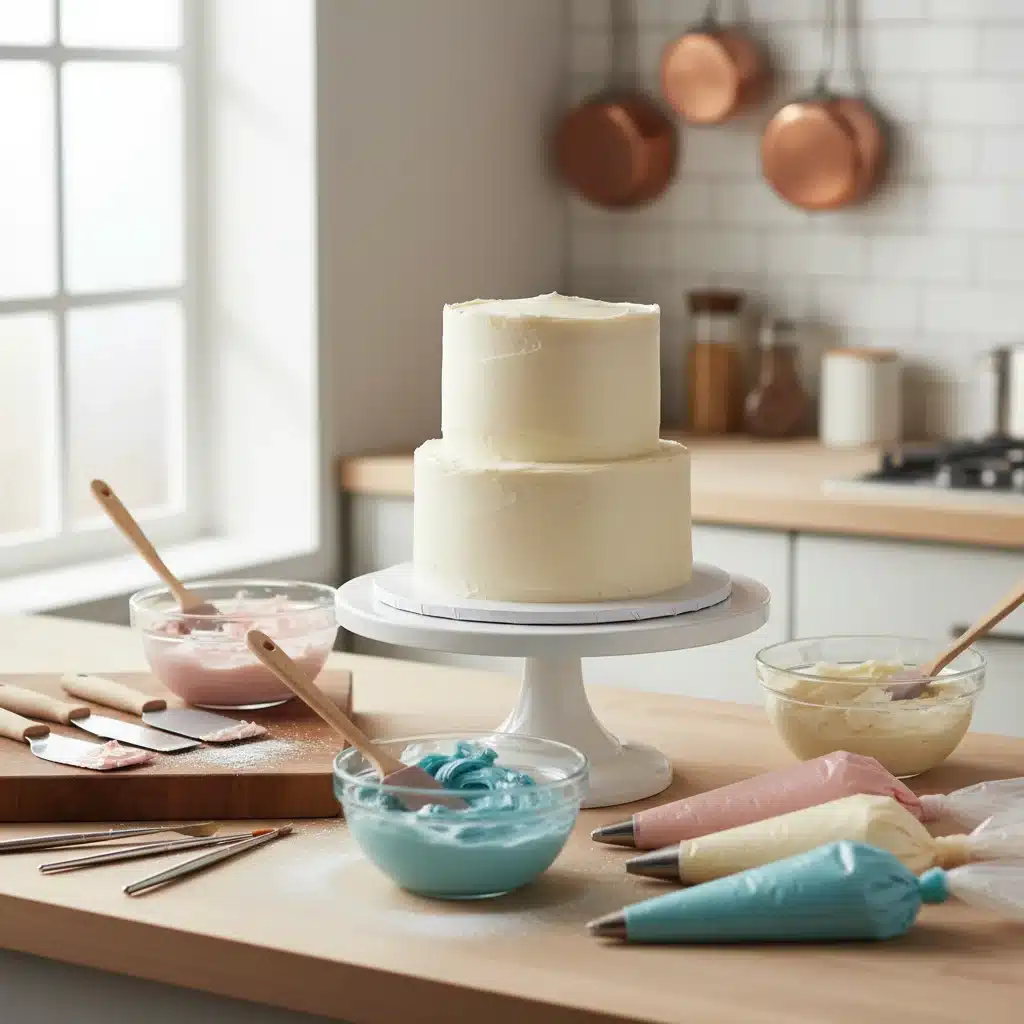
Technique 6: The Art of Application and Decoration
Even the most perfectly made bakery quality frosting needs proper application to shine. This involves a few key steps that will elevate your finished dessert.
1. Crumb Coating: Your Best Friend
A crumb coat is a thin layer of frosting applied to your cake to trap any loose crumbs. This is a non-negotiable step for a clean, smooth final layer of frosting. After baking and cooling your cake layers completely, apply a thin, even layer of frosting over the entire cake. Chill the cake in the refrigerator for 15-30 minutes until the crumb coat is set. This creates a stable, crumb-free canvas for your final frosting layer, ensuring a truly bakery quality frosting finish.
2. Even Application with an Offset Spatula or Bench Scraper
For the final layer of frosting, apply a generous amount to the top and sides of your cake. Use an offset spatula to spread it evenly. For impeccably sharp edges and smooth sides, a bench scraper (or cake scraper) is invaluable. Hold the scraper perpendicular to the cake and gently rotate your cake stand, allowing the scraper to remove excess frosting and create a perfectly smooth surface. Practice makes perfect here!
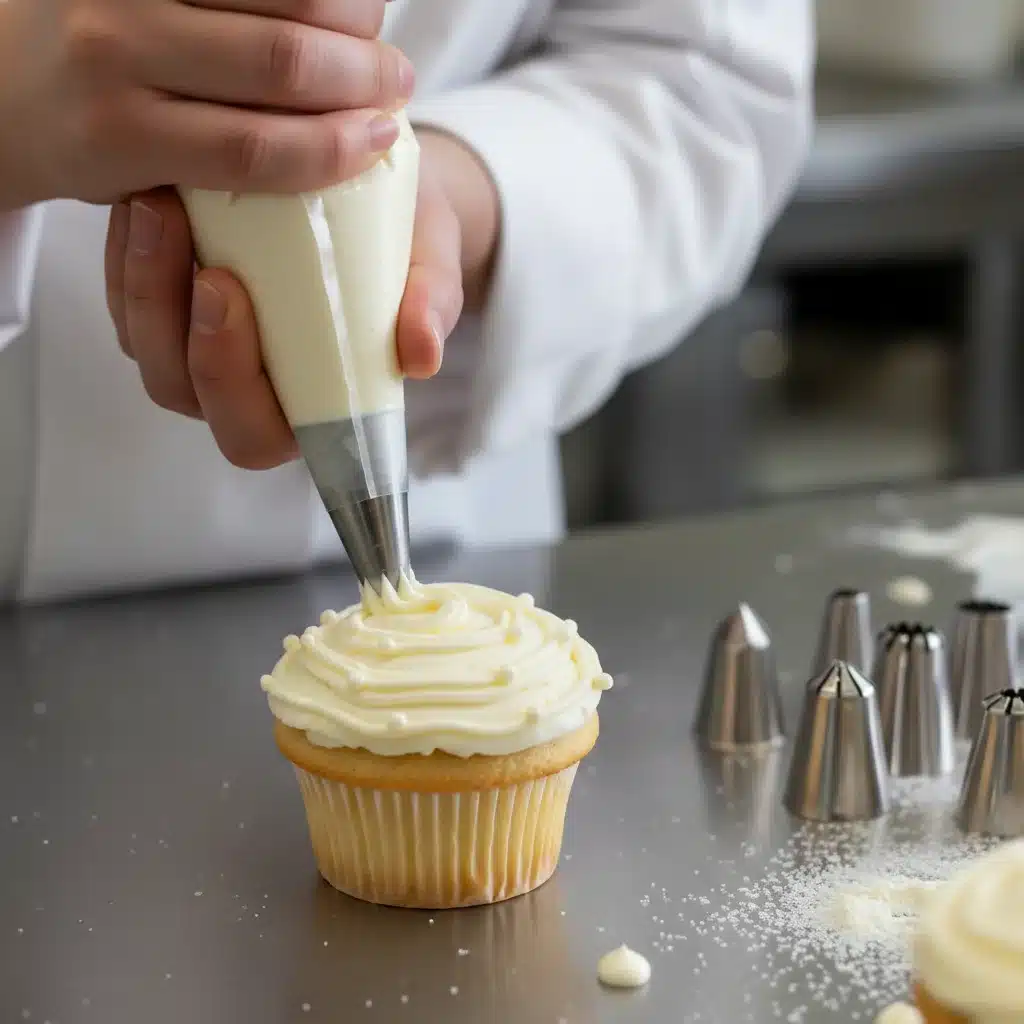
3. Piping Techniques for Visual Appeal
Piping adds elegance and professional flair. Invest in a basic set of piping bags and tips (round, star, leaf). Start with simple borders, rosettes, or swirls. Practice on a piece of parchment paper first to get a feel for the pressure and movement. For complex designs, consider using meringue-based buttercreams (Swiss or Italian) as they hold their shape exceptionally well. Adding food coloring (gel colors work best as they don’t add much liquid) can further enhance the visual impact of your bakery quality frosting.
4. Temperature Control During Decoration
Working with frosting, especially buttercreams, requires attention to temperature. If your kitchen is warm, your frosting might become too soft. If it’s too cold, it might be too stiff. If you notice your frosting softening while you’re decorating, pop it back into the fridge for 10-15 minutes, then re-whip it briefly to restore its ideal consistency. Similarly, if it’s too stiff to pipe, let it sit at room temperature for a few minutes or gently warm a small portion in the microwave (very carefully!) and mix it back in.
Advanced Tips for Next-Level Bakery Quality Frosting in 2026
Beyond the core techniques, here are a few extra pointers to push your bakery quality frosting to an even higher standard, keeping in mind the evolving dessert trends for 2026:
Embrace Natural Colorants:
While gel food colorings are effective, consider using natural colorants for a more sophisticated and health-conscious approach. Beetroot powder for pinks, spirulina for blues/greens, turmeric for yellows, or activated charcoal for striking black can create beautiful, subtle hues that align with emerging trends. These often require careful incorporation to avoid altering texture significantly.
Layering Flavors within Frosting:
Don’t just add one flavor. Consider complementary flavor profiles. For example, a hint of orange zest in a vanilla buttercream, or a touch of espresso powder in a chocolate ganache. Infuse your milk or cream with herbs (like rosemary or thyme) or spices (cinnamon stick, star anise) before making your frosting for unique, subtle notes.
Texture Play:
2026 dessert trends often emphasize textural contrasts. While your base bakery quality frosting should be smooth, consider adding elements like toasted nuts, crushed freeze-dried fruit, chocolate shavings, or even small edible pearls to the surface or between layers for an exciting textural experience.
Sustainability in Ingredients:
As consumers become more environmentally conscious, sourcing sustainable and ethically produced ingredients will be increasingly important. Look for fair-trade chocolate, organic dairy, and locally sourced fruits for your purees and garnishes. This not only tastes good but also tells a compelling story about your dessert.
Mastering the Mirror Glaze:
For truly show-stopping modern desserts, exploring mirror glazes (glacage) can take your visual presentation to an unparalleled level. While technically a glaze rather than a frosting, it often accompanies frosted cakes. Achieving a flawless, reflective mirror glaze requires precision with temperature and ingredients, but the result is undeniably professional and perfect for high-end 2026 dessert presentations.
Troubleshooting Common Frosting Problems
Even with the best techniques, problems can arise. Here’s how to tackle common issues with your bakery quality frosting:
- Gritty Frosting: You likely didn’t sift your powdered sugar, or didn’t beat it long enough. For American buttercream, continue beating for several more minutes. For meringue buttercreams, ensure your sugar was fully dissolved in the egg whites before whipping.
- Soupy/Runny Frosting: Usually due to butter being too warm or adding too much liquid. For buttercreams, chill the entire bowl for 15-30 minutes, then re-whip on medium-high speed. For meringue buttercreams, ensure your meringue was completely cool before adding butter. If it’s still soupy, it might be salvageable by adding a small amount of extra softened butter gradually while whipping.
- Curdled Meringue Buttercream: This happens when butter is added to meringue that is either too warm or too cold. Don’t panic! Continue beating. Often, it will come together after several minutes. If it’s still curdled, gently warm the bottom of the mixing bowl over a double boiler for 10-20 seconds (without melting the butter), then return to beating. Alternatively, if it’s too warm, chill for 10-15 minutes and then re-whip.
- Too Sweet: For American buttercream, a pinch of salt can help cut the sweetness. A splash of lemon juice or a cream cheese base can also provide a tangy counterpoint. Meringue buttercreams are naturally less sweet.
- Too Hard/Stiff: This can happen if the frosting is too cold. Let it come to room temperature for 15-30 minutes, then re-whip briefly until smooth and pliable. Add a teaspoon of liquid if needed.
Conclusion: Your Journey to Bakery Quality Frosting
Achieving bakery quality frosting is a journey of understanding ingredients, mastering fundamental techniques, and practicing patience. By focusing on proper butter consistency, meticulous sifting and gradual additions, selecting the right frosting type for your needs, thorough mixing and aeration, and precise application, you’re well on your way to creating stunning desserts.
Remember, every expert was once a beginner. Don’t be discouraged by initial imperfections. Each batch of frosting is an opportunity to learn and refine your skills. As you experiment with these six professional techniques, you’ll gain confidence and develop an intuitive feel for creating frostings that are not only delicious but also visually spectacular. Get ready to impress your friends, family, and even yourself with your elevated 2026 dessert creations!
So, gather your ingredients, fire up your mixer, and embark on your journey to becoming a home baker renowned for truly exceptional bakery quality frosting.


