Batch Baking 2026: 5 Sweet Treats That Freeze for Months

Anúncios
Are you constantly wishing you had more time to bake, but life just keeps getting in the way? Do you dream of having a delicious, homemade sweet treat readily available for unexpected guests, school lunchboxes, or simply to satisfy a sudden craving? If so, then you, my friend, are ready to embrace the glorious world of batch baking sweet treats. In 2026, efficiency and deliciousness go hand-in-hand, and there’s no better way to achieve both than by mastering the art of baking in bulk and freezing your delightful creations.
Anúncios
Imagine a freezer stocked with an array of your favorite cookies, brownies, and bars, all perfectly preserved and ready to be enjoyed at a moment’s notice. This isn’t just a fantasy; it’s an achievable reality with the right recipes and techniques. This comprehensive guide will walk you through everything you need to know about batch baking sweet treats, from the essential tools to the best freezing methods. We’ll then dive into 5 incredible recipes that are specifically designed to freeze beautifully for up to three months, ensuring you always have a delightful dessert on hand.
The benefits of batch baking sweet treats extend far beyond just having desserts readily available. It’s a fantastic way to save time, reduce food waste, and even manage your budget more effectively. By dedicating a few hours to baking, you can enjoy the fruits of your labor for weeks, if not months, to come. So, tie on your apron, preheat your oven, and let’s embark on a journey to become a batch baking master!
Anúncios
What Exactly is Batch Baking Sweet Treats?
At its core, batch baking sweet treats is simply the practice of making larger quantities of baked goods than you’d typically consume in one sitting, with the intention of storing the excess for later. This isn’t just about doubling a recipe; it’s about strategic planning to maximize your baking efforts. Instead of baking a dozen cookies every week, you might bake four dozen once a month, freezing the majority.
The beauty of batch baking lies in its efficiency. Think about it: you’re already getting out all your ingredients, dirtying your mixing bowls, and preheating your oven. Why not make the most of that effort? By increasing the yield, you reduce the frequency of these tasks, freeing up valuable time for other activities. This method is particularly popular among busy parents, meal preppers, and anyone looking to streamline their kitchen routine while still enjoying homemade goodness.
When it comes to sweet treats, batch baking is a game-changer. Cookies, brownies, muffins, and many types of bars are excellent candidates for freezing. They retain their flavor and texture remarkably well, often tasting just as fresh after thawing as they did on the day they were baked. The key, as we’ll explore, lies in proper preparation and freezing techniques.
Why Embrace Batch Baking Sweet Treats in 2026? The Benefits Are Sweet!
The reasons to incorporate batch baking sweet treats into your routine are numerous and compelling. In our fast-paced world, finding ways to save time and reduce stress is always a win. Here’s why you should seriously consider becoming a batch baking enthusiast:
Time-Saving Efficiency
This is perhaps the most obvious benefit. By dedicating a concentrated block of time to baking, you eliminate the need for daily or weekly baking sessions. Imagine having a stash of ready-to-go desserts that only require a quick thaw or reheat. This is invaluable on busy weekdays or when unexpected guests arrive.
Always Have a Treat on Hand
No more last-minute grocery runs for a dessert! Whether it’s for a school bake sale, a potluck, or just a personal sweet craving, your freezer becomes a treasure trove of delightful options. This also helps prevent impulse purchases of less healthy store-bought alternatives.
Budget-Friendly Baking
Buying ingredients in bulk often leads to cost savings. When you plan your batch baking sessions, you can take advantage of sales on flour, sugar, butter, and other staples. Plus, by making your own treats, you’re likely spending less than if you were buying pre-made desserts from a bakery or supermarket.
Reduced Food Waste
Ever bake a batch of cookies and find yourself struggling to finish them before they go stale? Freezing allows you to enjoy your baked goods at your own pace, preventing spoilage and reducing food waste. You can simply take out what you need, when you need it.
Stress-Free Entertaining
Hosting a dinner party or a gathering? Having a selection of homemade desserts already prepared and frozen will significantly reduce your stress levels on the day of the event. Just thaw and serve!
Portion Control and Healthy Choices
When you bake at home, you control the ingredients. This allows for healthier substitutions if desired. Furthermore, freezing individual portions can help with portion control, making it easier to enjoy a sweet treat without overindulging.
Essential Tools for Successful Batch Baking Sweet Treats
Before we dive into the recipes, let’s ensure you have the right arsenal of tools to make your batch baking sweet treats journey smooth and successful. While you don’t need a professional kitchen, a few key items will make a significant difference:
- Large Mixing Bowls: Multiple large bowls are essential for mixing bigger batches of dough or batter.
- Stand Mixer or Hand Mixer: While not strictly necessary for all recipes, a mixer will save your arms a lot of work when creaming butter and sugar or mixing large volumes of dough.
- Measuring Cups and Spoons: Accurate measurements are crucial for consistent results, especially when scaling up recipes.
- Baking Sheets: Several baking sheets will allow you to bake multiple trays at once or prepare one while another is in the oven.
- Parchment Paper or Silicone Baking Mats: These prevent sticking, ensure even baking, and make cleanup a breeze.
- Cooling Racks: Essential for allowing baked goods to cool completely before packaging for freezing.
- Airtight Freezer-Safe Containers: Glass or sturdy plastic containers are ideal for protecting your treats from freezer burn.
- Heavy-Duty Freezer Bags: Great for smaller items like cookies or pre-portioned dough. Squeeze out as much air as possible before sealing.
- Plastic Wrap and Aluminum Foil: Useful for double-wrapping items to provide an extra layer of protection against freezer burn.
- Permanent Marker and Labels: Crucial for labeling your frozen goods with the date and contents. Trust us, you won’t remember what’s what after a month!
Mastering the Freeze: Best Practices for Sweet Treats
The success of your batch baking sweet treats hinges on proper freezing techniques. Follow these guidelines to ensure your desserts emerge from the freezer as delicious as they went in:
- Cool Completely: This is perhaps the most critical step. Never freeze warm or even slightly warm baked goods. Condensation will form, leading to ice crystals and soggy textures. Ensure everything is at room temperature before packaging.
- Flash Freeze (for some items): For individual cookies, muffins, or slices of cake, flash freezing can prevent them from sticking together. Place them in a single layer on a baking sheet lined with parchment paper and freeze for 1-2 hours until solid. Then, transfer to airtight containers or freezer bags.
- Wrap Tightly: Air is the enemy of frozen food. Wrap individual items or smaller batches tightly in plastic wrap, then an additional layer of aluminum foil. This double-layer protection is excellent for preventing freezer burn.
- Use Airtight Containers: After wrapping, place your baked goods in airtight freezer-safe containers or heavy-duty freezer bags. Press out as much air as possible from bags before sealing.
- Label Everything: Always label your containers or bags with the contents and the date it was frozen. This helps you keep track of your inventory and ensures you consume items within their optimal freezing window (typically up to 3 months for most sweet treats).
- Thawing Instructions: Most sweet treats benefit from thawing slowly in the refrigerator overnight. Smaller items like cookies can often be thawed at room temperature for an hour or two, or even gently reheated in a low oven for a fresh-baked feel.
5 Sweet Treat Recipes That Freeze Beautifully for Up to 3 Months
Now for the main event! Here are five fantastic recipes perfectly suited for batch baking sweet treats and freezing. Each one is designed for success in the freezer, ensuring a delightful experience every time.
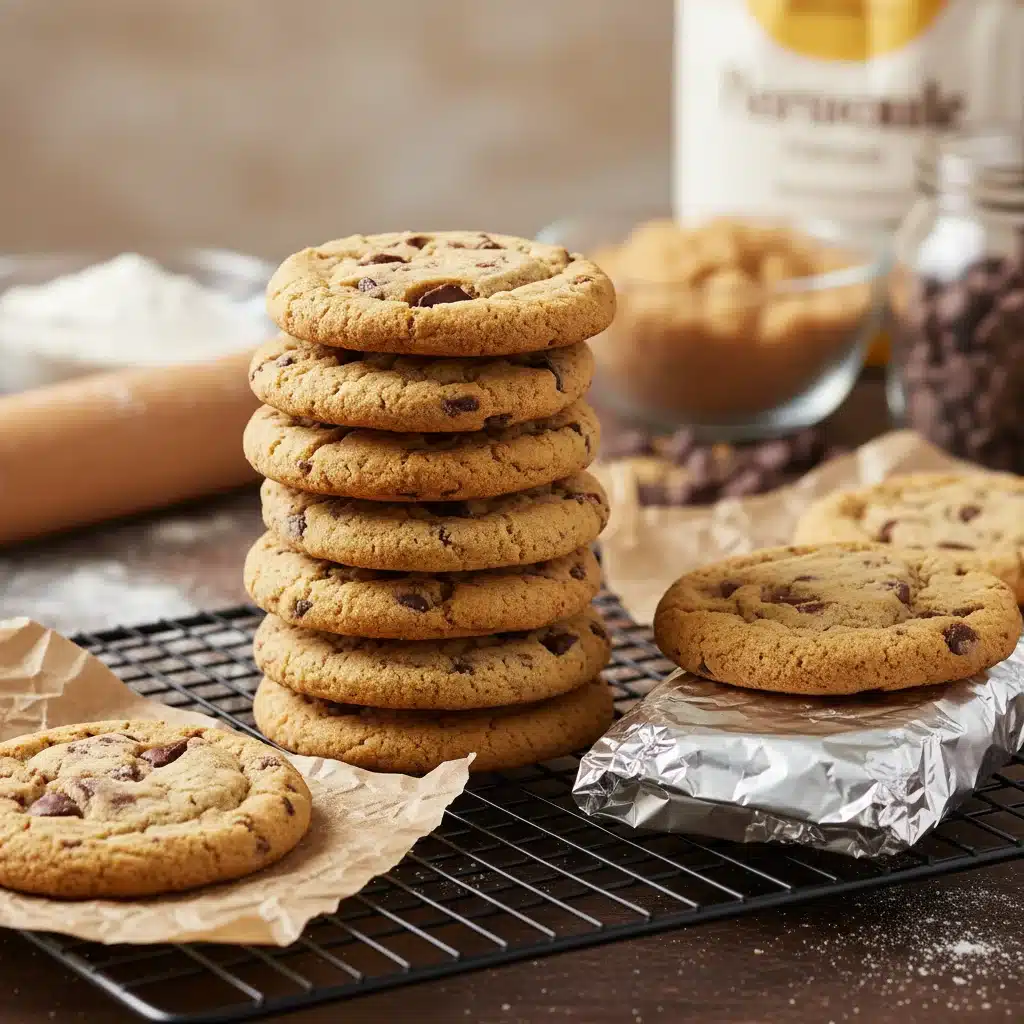
1. Classic Chocolate Chip Cookies (Freezes as Dough or Baked)
The undisputed king of comfort food, chocolate chip cookies are a perfect candidate for batch baking. You can freeze the dough or the baked cookies, offering incredible flexibility.
Recipe: Classic Chocolate Chip Cookies
- Yield: Approximately 4 dozen cookies
- Prep time: 20 minutes
- Bake time: 10-12 minutes per batch
Ingredients:
- 2 ¼ cups all-purpose flour
- 1 teaspoon baking soda
- 1 teaspoon salt
- 1 cup (2 sticks) unsalted butter, softened
- ¾ cup granulated sugar
- ¾ cup packed light brown sugar
- 2 large eggs
- 1 teaspoon vanilla extract
- 2 cups (12 oz) chocolate chips (milk, semi-sweet, or a mix)
Instructions:
- Preheat oven to 375°F (190°C). Line baking sheets with parchment paper.
- In a small bowl, whisk together flour, baking soda, and salt.
- In a large bowl, cream together softened butter, granulated sugar, and brown sugar until light and fluffy.
- Beat in the eggs one at a time, then stir in the vanilla extract.
- Gradually add the dry ingredients to the wet ingredients, mixing until just combined. Do not overmix.
- Stir in the chocolate chips.
- For freezing dough: Drop rounded tablespoons of dough onto a parchment-lined baking sheet. Flash freeze until solid (about 1-2 hours). Transfer frozen dough balls to a heavy-duty freezer bag. Label with baking instructions (bake from frozen at 375°F for 12-15 minutes, or until edges are golden).
- For freezing baked cookies: Bake cookies as usual until golden brown at the edges. Let cool completely on a wire rack. Once fully cooled, flash freeze on a baking sheet. Transfer frozen cookies to an airtight freezer-safe container or heavy-duty freezer bag, separated by parchment paper.
2. Fudgy Brownie Squares (The Ultimate Crowd-Pleaser)
Brownies are incredibly freezer-friendly, retaining their moist, fudgy texture beautifully. They’re perfect for cutting into individual portions before freezing.
Recipe: Fudgy Brownie Squares
- Yield: 24 squares
- Prep time: 15 minutes
- Bake time: 25-30 minutes
Ingredients:
- 1 cup (2 sticks) unsalted butter
- 1 cup unsweetened cocoa powder
- 2 cups granulated sugar
- 4 large eggs
- 1 teaspoon vanilla extract
- 1 cup all-purpose flour
- ½ teaspoon salt
- 1 cup chocolate chips (optional, for extra fudginess)
Instructions:
- Preheat oven to 350°F (175°C). Grease and flour a 9×13 inch baking pan, or line with parchment paper leaving an overhang on the sides for easy removal.
- In a large microwave-safe bowl, melt the butter. Stir in the cocoa powder until smooth.
- Whisk in the granulated sugar until well combined.
- Beat in the eggs one at a time, then stir in the vanilla extract.
- Fold in the flour and salt until just combined. If using, fold in the chocolate chips. Do not overmix.
- Pour the batter into the prepared pan and spread evenly.
- Bake for 25-30 minutes, or until a toothpick inserted into the center comes out with moist crumbs, not wet batter. Do not overbake.
- Let cool completely in the pan on a wire rack.
- Once fully cooled, use the parchment paper overhang to lift the brownie slab out of the pan. Cut into desired squares.
- To freeze: Wrap individual brownie squares tightly in plastic wrap, then place them in an airtight freezer-safe container or heavy-duty freezer bag. Separate layers with parchment paper if stacking.
- To thaw: Thaw individual brownies at room temperature for 1-2 hours, or in the refrigerator overnight. You can also gently warm them in the microwave for a few seconds for a freshly baked feel.
3. Blueberry Muffins (Perfect for Breakfast or Snack)
Muffins are ideal for batch baking and freezing. They make for a quick and easy breakfast or a delightful snack that you can grab straight from the freezer.
Recipe: Classic Blueberry Muffins
- Yield: 12 large muffins
- Prep time: 15 minutes
- Bake time: 20-25 minutes
Ingredients:
- 1 ½ cups all-purpose flour
- ½ cup granulated sugar
- 2 teaspoons baking powder
- ¼ teaspoon salt
- 1 large egg
- ¾ cup milk
- ¼ cup vegetable oil or melted butter
- 1 teaspoon vanilla extract
- 1 cup fresh or frozen blueberries (do not thaw if frozen)
Instructions:
- Preheat oven to 400°F (200°C). Line a 12-cup muffin tin with paper liners or grease well.
- In a large bowl, whisk together flour, sugar, baking powder, and salt.
- In a separate medium bowl, whisk together egg, milk, oil (or melted butter), and vanilla extract.
- Pour the wet ingredients into the dry ingredients and mix until just combined. Do not overmix; a few lumps are fine.
- Gently fold in the blueberries.
- Divide the batter evenly among the muffin cups, filling each about two-thirds full.
- Bake for 20-25 minutes, or until golden brown and a toothpick inserted into the center comes out clean.
- Let cool in the muffin tin for a few minutes before transferring to a wire rack to cool completely.
- To freeze: Once fully cooled, flash freeze the muffins on a baking sheet until solid. Transfer frozen muffins to a heavy-duty freezer bag or an airtight freezer-safe container.
- To thaw: Thaw muffins at room temperature for 1-2 hours, or microwave for 30-60 seconds (or until warm) for a quick treat.
4. Lemon Poppy Seed Scones (Elegant & Easy to Freeze)
Scones are wonderfully versatile and freeze exceptionally well, either baked or as raw dough. They’re perfect for a sophisticated brunch or afternoon tea.
Recipe: Lemon Poppy Seed Scones
- Yield: 8 large scones
- Prep time: 20 minutes
- Bake time: 15-18 minutes
Ingredients:
- 2 cups all-purpose flour
- ¼ cup granulated sugar
- 1 tablespoon baking powder
- ½ teaspoon salt
- ½ cup (1 stick) unsalted butter, very cold and cut into small pieces
- 1 large egg
- ½ cup heavy cream (plus extra for brushing)
- 1 tablespoon lemon zest
- 2 tablespoons poppy seeds
Instructions:
- Preheat oven to 400°F (200°C). Line a baking sheet with parchment paper.
- In a large bowl, whisk together flour, sugar, baking powder, and salt.
- Cut in the cold butter using a pastry blender, your fingertips, or a food processor until the mixture resembles coarse crumbs with some pea-sized pieces of butter remaining.
- In a small bowl, whisk together the egg, heavy cream, lemon zest, and poppy seeds.
- Pour the wet ingredients into the dry ingredients and mix with a fork until just combined. The dough will be shaggy.
- Turn the dough out onto a lightly floured surface and gently bring it together. Pat it into an 8-inch circle, about ¾ to 1 inch thick.
- Cut the circle into 8 wedges.
- For freezing raw dough: Place the raw scone wedges on the parchment-lined baking sheet and flash freeze until solid. Transfer to a heavy-duty freezer bag. Bake from frozen at 400°F (200°C) for 20-25 minutes, brushing with cream before baking.
- For freezing baked scones: Place the wedges on the prepared baking sheet. Brush the tops with a little extra heavy cream. Bake for 15-18 minutes, or until golden brown. Let cool completely on a wire rack. Once fully cooled, flash freeze, then transfer to an airtight freezer-safe container or heavy-duty freezer bag.
- To thaw: Thaw baked scones at room temperature for 1-2 hours, or gently reheat in a low oven (300°F/150°C) for 5-10 minutes.
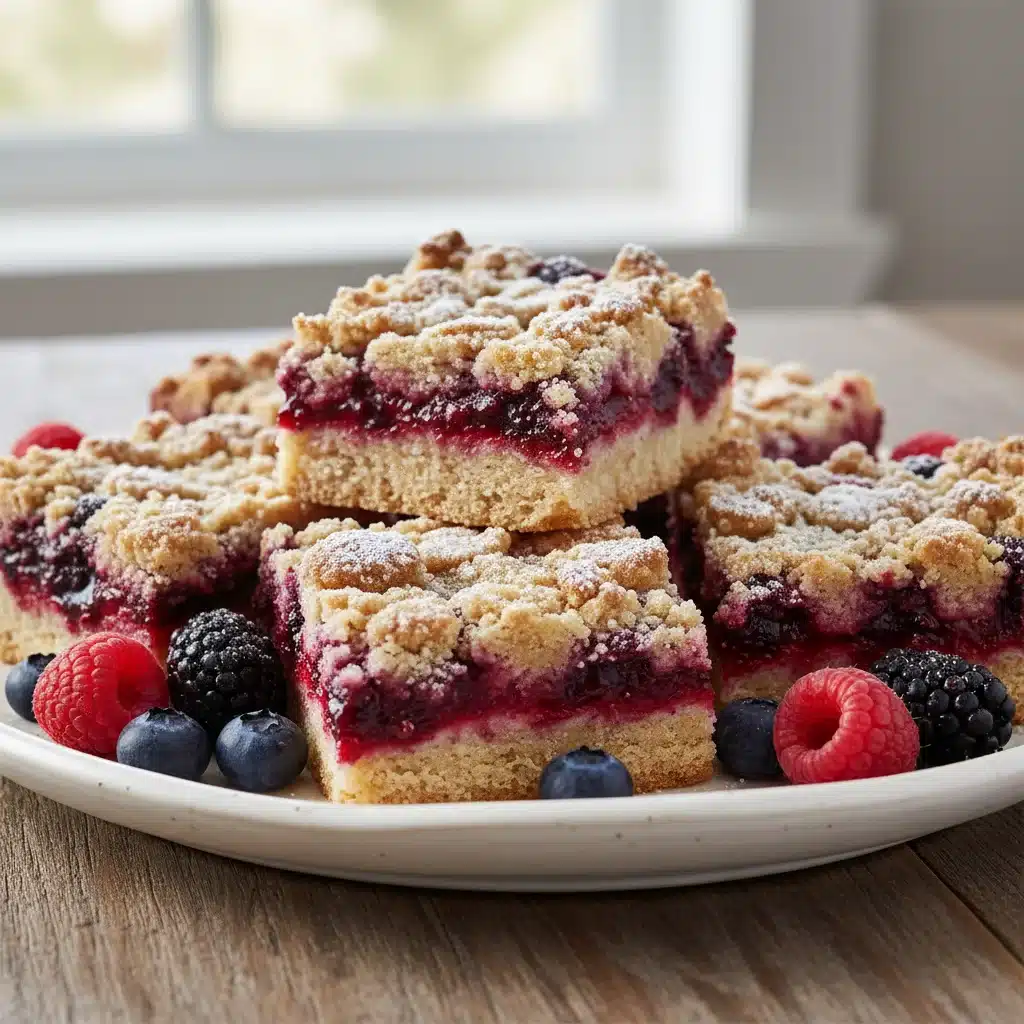
5. Berry Crumble Bars (Fruity & Fantastic)
These crumble bars offer a delightful balance of sweet and tart, and they hold up exceptionally well in the freezer. Perfect for a dessert or a substantial snack.
Recipe: Berry Crumble Bars
- Yield: 16-20 bars
- Prep time: 25 minutes
- Bake time: 40-45 minutes
Ingredients:
- For the Crust & Crumble:
- 1 ½ cups all-purpose flour
- ½ cup rolled oats
- ½ cup packed light brown sugar
- ½ teaspoon baking powder
- ¼ teaspoon salt
- ¾ cup (1 ½ sticks) unsalted butter, very cold and cut into small pieces
- For the Berry Filling:
- 3 cups mixed berries (fresh or frozen, e.g., blueberries, raspberries, blackberries)
- ¼ cup granulated sugar (adjust to taste based on berry sweetness)
- 1 tablespoon lemon juice
- 2 tablespoons cornstarch
Instructions:
- Preheat oven to 375°F (190°C). Line a 9×13 inch baking pan with parchment paper, leaving an overhang on the sides.
- Make the Crust & Crumble: In a large bowl, whisk together flour, oats, brown sugar, baking powder, and salt.
- Cut in the cold butter using a pastry blender, your fingertips, or a food processor until large crumbs form.
- Press about two-thirds of the crumble mixture evenly into the bottom of the prepared pan to form the crust.
- Make the Berry Filling: In a separate bowl, combine the berries, granulated sugar, lemon juice, and cornstarch. Toss gently to coat.
- Spread the berry filling evenly over the crust.
- Sprinkle the remaining crumble mixture over the berry filling.
- Bake for 40-45 minutes, or until the crumble topping is golden brown and the berry filling is bubbly.
- Let cool completely in the pan on a wire rack. This is crucial for the bars to set properly.
- Once fully cooled, use the parchment paper overhang to lift the slab out of the pan. Cut into desired bars.
- To freeze: Wrap individual bars tightly in plastic wrap, then place them in an airtight freezer-safe container or heavy-duty freezer bag, separated by parchment paper if stacking.
- To thaw: Thaw individual bars in the refrigerator overnight or at room temperature for 2-3 hours.
Additional Tips for Batch Baking Sweet Treats Like a Pro
To ensure your batch baking sweet treats efforts are always a resounding success, keep these expert tips in mind:
- Read Recipes Thoroughly: Before you start, read the entire recipe. This helps you anticipate steps and gather all necessary ingredients and equipment.
- Mise en Place: Get all your ingredients measured and ready before you begin mixing. This French culinary term means “everything in its place” and it’s a huge time-saver for batch baking.
- Double Check Quantities: When scaling up recipes, double-check your measurements, especially for leavening agents like baking soda and powder. Too much can lead to off-flavors, too little can result in flat baked goods.
- Invest in Good Quality Ingredients: Since you’re putting in the effort to batch bake, use good quality butter, chocolate, and fresh extracts for the best flavor.
- Cooling is Key: We can’t stress this enough. Rushing the cooling process will lead to soggy, icy results in the freezer. Patience is a virtue here.
- Rotate Your Stock: Just like with any frozen food, try to use the oldest items first. This ensures you’re always enjoying the freshest possible frozen treats.
- Consider Your Freezer Space: Before you embark on a massive batch baking spree, make sure you have adequate freezer space to store all your delicious creations.
- Experiment with Flavors: Once you’re comfortable with the basics, don’t be afraid to experiment! Add different spices, nuts, or dried fruits to your favorite recipes to create variety.
Conclusion: Your Freezer, Your Sweet Treat Haven in 2026
Embracing batch baking sweet treats is more than just a culinary technique; it’s a lifestyle upgrade. It’s about taking control of your time, reducing stress, and ensuring that a delightful, homemade treat is never more than a few moments away. By following the tips and recipes outlined in this guide, you’ll transform your freezer into a sweet treat haven, ready to satisfy any craving or occasion in 2026 and beyond.
From classic chocolate chip cookies to elegant lemon poppy seed scones, these freezer-friendly recipes prove that convenience doesn’t have to come at the expense of quality or flavor. So, go ahead, dedicate an afternoon to baking, fill your kitchen with wonderful aromas, and then sit back and enjoy the sweet rewards of your foresight. Happy batch baking!


